Showing posts with label crafty. Show all posts

Wednesday, April 27, 2011

The Man in Black

Alternate title: Not to be confused with "Men in Black"

Johnny Cash's music is rattling around in my head.

"I hear the train a comin'
It's rollin' 'round the bend
And I ain't seen the sunshine,
Since, I don't know when,
I'm stuck in Folsom Prison,
And time keeps draggin' on,
But that train keeps a-rollin',
On down to San Antone."


I don't usually read too much into my random thoughts, especially when songs get stuck in my head. 
Let's face it - music get stuck in my head way too often for me to have really deep thoughts about it. 
This time is different. I think. 
I'm not really sure if it's the "train a comin'" part that I'm concerned about, or the "I'm stuck in Folsom Prison" line that I'm whining about. 


Concern? 

Whine?


Erm, I'm going with Concern. Yeah. Uh huh. Concern tinged with excitement.


Why? 

I leave for Barcelona a mere 2 weeks from Friday. Yes really! 


I'm so excited, I'm ready to start packing my bags. Or at least maybe making a list of what I'm going to pack. Yes, a list is a grand idea. I wonder what I'm going to forget on this trip - Allie's law, I always forget something. 


I hope it isn't deodorant (not that it'd make a difference in Europe, they don't believe in that stuff). Heaven forbid UBS (undies, bras and socks - thank a college roommate for that acronym!). I'm sure I'll have extra UBS, just because I'm a wee bit paranoid about running out of the "U" part of that. 


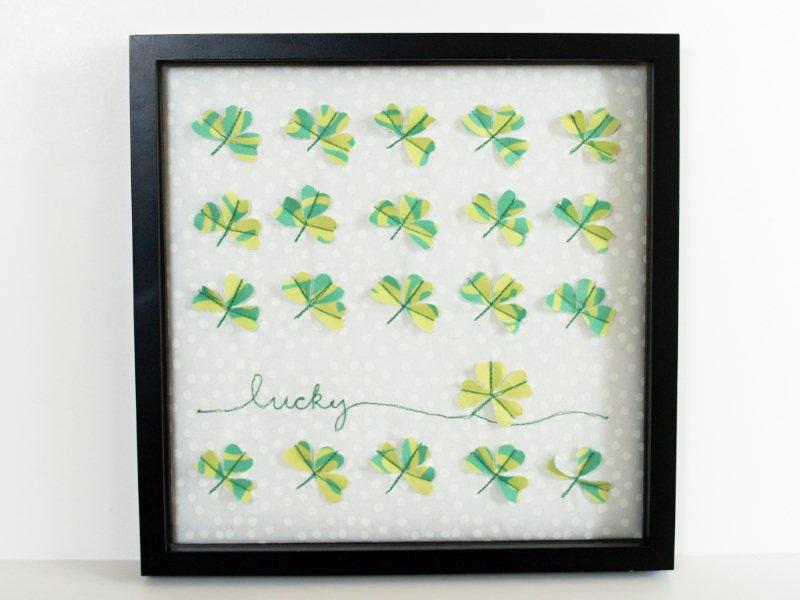
While I go make my list, take a look at the finished shadow box which was a gift for my Canadian friend, Erin.  


I love the way it turned out! I sent it to her in honor of her 2nd Wedding Anniversary, and while it isn't exactly cotton, I hope she'll treasure it. 


Back to the list. Passport (check), Euros (check), iPod (check), camera (check), extra memory card (check), power converter/adapter (check) - well you get the idea. It's endless. How the heck am I supposed to fit 10 days worth of crap stuff into 1 large suitcase and 1 rollerboard?? 


I'm not known for being a light packer either. "kitchen sink" is often muttered in reference to my luggage. Heaven forbid I forget any clothing - the anorexics in Europe don't make fat girl clothes. 


Bottom line - I can't forget ANYTHING. Thus, I must have a list. 


"I fell in to a burning ring of fire.
I went down, down, down
and the flames went higher. 
It burns, burns burns, this ring of fire.
Ring of fire."


I'll let you read what you want into that particular song. 


Enjoy your new day!! 

Saturday, April 16, 2011

More Crafty Goodness!!

I needed some zen today, and hid out in my craft room. I wanted to make a gift for a dear friend, and decided to copy a project designed & taught by Lisa Pace at the 2010 Artistic Journey.

Just to be clear...this is not my design. Not my idea. 100% copycat. (cuz crafters can get persnickety about stuff like that, even if it's inadvertent).

Supply list:
Maya Road shadow box
Jenni Bowlin mini-papers in a variety of red, cream & black patterns
Maya Road mini chipboard tag set and miscellaneous shapes (spool, needle, butterfly, heart, lock, key and tree)
Craft pearls (I don't know what these are called - they are half of a bead, and found on clear plastic so you can cut a string of them really easily!)
Glass glitter (silver)
Twine
Trim
3 Pearl buttons
Chalk ink - creamy brown
Craft knife
Adhesive (I used Glossy Accents, glue dots and tacky tape - yes, all THREE. hush)

The trick to this project is layering the mini tags, chipboard shapes and various paper patterns. Throw in the pearls and some glass glitter (BLING!), and a few heartfelt words from your printer, and voila!

Okok, so like, it took me most of the day to do this. But isn't it worth it???


Here are my creation steps:
1. Paint the backside of the shadow box, set aside to dry.

2. Choose the background papers - shuffled them around until I got the order I liked. I numbered the inserts and the back of the paper to keep everything together.

3. Assuming the back is dry, paint the front of the shadow box, and inside. Set aside to dry.

4. Choose the chipboard pieces that would go on top. And the paper that would go on them (again, I'm copy-catting this, so it was a little easier to choose the shapes). Then I numbered the chipboard pieces based on the squares, so I would remember which one goes where.

3. Using Glossy Accents, glue the chipboard onto the paper, and set aside to dry.

4.  Still using Glossy Accents, glue the background paper to the insert squares, and set aside to dry.

5. Lightly dab the gold chalk ink around the outer front edges of the shadow box.

6. Put a healthy dose of Glossy Accents on the chipboard that is getting glitter, add the glitter, and set aside to dry.

7. When chipboard shapes are dry, go ahead and begin to cut them out with a craft knife.

8. Outline all the chipboard shapes and the background squares with Creamy Brown Chalk ink.

9. Assemble each square. I used tacky tape to adhere the chipboard shapes to each other, and to secure in the squares into the shadow box.

Now, I will say this picture doesn't include two small personalizations I added - I still want it to be a surprise! I added an initial to the middle square (oval tag), and a date to the tag next to the tree in the lower left square).

I also wanted to share a few little tips with you that made this project come together for me (the classic imperfect crafter!).

1. It's difficult - even with a craft knife - to cut the paper around these scallop shapes. I do the best I can with the craft knife, and then refine with an emory board (nail file). Even then, it still isn't 100%. I used the creamy brown chalk ink to outline every shape - it ties all of the patterns together, and hides imperfections. In the pic above, you don't notice them. But look what happens when I blow it up:


2. I used gold chalk ink to highlight the shadow box itself. It gives some depth to it, instead of a flat black. You can really see the gold in the zoomie pics above and below.

3. I love glitter. I hate the fact that once you break out the glitter, you walk around looking like you got lost on the way to the club 15 years ago your entire household will be wearing it for weeks. I also hate the fact that glitter tends to shed with any accidental touch or bang. One way to avoid that is to seal the glitter with Glossy Accents. Keeps the shimmer, keeps the glitter in place. Especially with the glass glitter which will tarnish as time goes by.


4. Twine - this is not butcher's twine unfortunately, it's craft twine, and you need to add some sort of wax to it to keep it from driving you crazy make it easier to work with. A simple bar of white soap will do the trick. Run your length of twine through the soap a couple of times and it'll coat it just like wax. This is a trick I learned waaaay back when my mother tried to teach me to - well, I don't remember what she was trying to teach me to do (sorry mom!).

I enjoyed my day in my craft room, creating this gift for a friend.

Enjoy your new day!!

Thursday, April 14, 2011

Queen of Hearts

In case you missed it, Michele at The Scrap Shoppe had me as a guest poster earlier this week.

Here's the reprise of that post!

About a year ago I created this little shadow box for an Alice in Wonderland-themed craft challenge I hosted.


Excuse the poor pic - it was BC (before camera!). Ironically, the winner of the challenge was our very own fabulous crafty one - Michele. The shadow box was the prize for the winner, and it now lives with her.

I bought several shadow boxes when I bought this one, and they've been patiently waiting for me to find my craft mojo. When Michele asked for guest bloggers during her maternity leave, I knew it was time to brush the dust off the shadow boxes and bring out this idea again.

I was also inspired by the recent similar craft posted by the uber-fab Bev at Flamingo Toes


Except I don't sew. Ever.

With those thoughts in mind, I gathered my basic supplies:
Black & white patterned paper
heart stamp sets
Real Red & Eggplant Stampin up ink (for a choice in colors)
Heart punches
Empty Ikea shadow box


I should probably explain that I'm an organic crafter. Pesticide free and all that - hehe. Okok, what I mean is that I generally start my crafting with an idea, and some basics, and enhance it and build it as I go. So where I start is usually not where I expect to finish.

This little project was no different. I thought I was recreating the original, symetrical Queen of Hearts. WRONG! I went with a more - well organic - look.

I started by stamping some images in both red and purple. Purple because I intend to accent our master bedroom in purple. Then I cut out each of the images. One of my favorite tidbits: move the paper and keep your scissors still for a more clean cut out.


I realized that the white cardstock I used to stamp the images on, and the white chip board I intended to use as a backdrop were a wee bit different. Enough to make it noticeable. Time to dig into my paper stash to look for an alternative.

EUREKA! I had a stash of sugar (glitter) paper, and a black that would make a nice background. I cut the background to size (9x9 in this case), and then used my heart punch to cut hearts out of several different black and white patterned paper.

I began to arrange the hearts on the background


I liked the glitter as background, and the pop of the red. I love the black and white hearts too. But I felt it was very flat (well DUH - paper + paper = flat!). And there's a lot of negative space (I can't handle negative space!)

I set out to correct those two issues quite easily. First, I added another heart to each row. Then I either folded the black and white hearts, or wrapped them around a finger to bend the paper and make them pop. Lastly, I dug into my extensive ribbon stash to add a little more pop. And my button stash.


I used FabriTac as my adhesive - it allowed me to flutter the ribbon a bit, and be precise with the various paper bends. Plus I knew it'd work well with the glitter paper.

Then I simply insert the finished piece into the shadow box.

But I wasn't done yet. I went back to my ribbon stash to add a little more flare. and then - then I was DONE.

(Uhm, please excuse the glare. Some things I haven't quite figured out how to avoid yet)


What I really love about this project is that the background can be changed by season, by holiday, or even by decorating whim. I'm going to create another one with the purple for my room.

Thanks for looking, and enjoy your new day!!

Thursday, November 4, 2010

How do you DO that??

I know you've been on pins and needles waiting for me to post the tutorial for the glass charms.

Well folks, the wait is over!

So let's go.

First: gather your supplies:


That's right - 4 adhesives! Here's the supply list:
ModPodge (acid free)
E6000
Glossy Accents (or Diamond Glaze)
Acid Free Liquid Adhesive (I like Tombow Mono Multi Liquid Glue)
Ball Chain
Ball Chain Connectors (packet on left)
Glue-on Bails (packet on right)
Glass Tiles
Craft knife
Scissors

Choose either photos, or patterned paper you love. For this example, I'm using photos as the focal point of the pendants. My printer has settings that allow me to print in wallet size or smaller, which work well for these pendants.

Ready? here we go!
1. Trim your photo:
for the DFW Pug Rescue charms I did, the picture took up almost the entire charm. therefore, very little trim was needed:


I needed a little more trimming with the charms for SNPR:


Steps 1 & 2

for the rest of this post, I'll focus on the SNPR charms.
2. Add a layer of ModPodge over the photos (to seal the ink, and keep it from running). Now, this is very important. LET IT DRY.

That's right, walk away. Let it dry.

3. Choose a pattern paper to act as the background for your photo/charm. In this case, I chose a black & white pattern to pop the color on our pampered SNPR pug (left side of photo below). Adhere the photo to the background paper, being sure to leave plenty of border for the tiles to fit in. I use the Tombow Mono to adhere this step (quick drying).


Steps 3 & 4
4. Adhere the glass tiles to the photo/background paper using Glossy Accents or Diamond Glaze (right and bottom row). do your best to get an even coat over the entire tile.

And then walk away again. Let them dry!!

5. Take a craft knife or very sharp pair of scissors and split the tiles. Then trim away any excess paper. Your charms should now look like this:


Now, if you really wanted to, you could skip the next step and cruise on down to Step #8 where you add the bails. But I'm a stickler for details, and I couldn't have a blank backing.

6. Using either ModPodge or the Tombow Mono, adhere another patterned paper to the backside of the charms. I used two different scraps for the charms below:


Once again, let them dry. Walk away...


7. Add a thin layer of Glossy Accents to the paper backing to seal them in. This is also a good place to reseal any spots where the Glossy Accents didn't adhere to the glass tile.

ok - you know the drill. Walk away...let them dry.

8. Whew, finally! Time to add the bails. Break out the E6000 (you may want to make sure you have decent ventilation - this stuff is seriously stinky!), and adhere the bails to the back of the charms.


Uh huh, you guessed it. Give them some drying time.

Are you humming the jeopardy theme song yet?

Well, that's it! You now have charms! Errr, pendants. I can't vouch for your charms, or lack of...wouldn't dare. Nope, nuh unh. Not me.

Voila!!! 


The glass tiles are available in a wide variety of sizes and shapes. The ones above were 1.75" squares.

I've also done some earrings (using a handmade asian paper): 


Gorgeous, huh?? And super easy!!!!

Ok, so I also promised to spill my secret dealer supplier. Or not so secret. Before I do, I want to say that I am sharing this seller with you b/c I've had great dealings with her, and have been very happy with the quality of her products. I'm not famous talented important anything enough to receive any sort of endorsements, yadda yadda yadda. I did shop around (the internet), and liked her prices best.

The adhesives can all be found at your local Joann's, Michaels, Hobby Lobby or other craft store.

I like to get my glass tiles, ball chain, fasteners and bails from Kristens Krafts, an Etsy seller.

I shared this technique with my crafty and creative friend Kim (who has two fledgling Etsy shops - check them out - Jewelry and Charms and Sugar Skulls and Goth Fun).

She came up with this uber cool Dorothy pendant:


And the back is red glitter!!! Doncha just LOVE it?

(If you're quick, she just put it into her Jewelry & Charms Etsy shop: Deconstructed Dorothy)

What are you inspired to create? Do you have a photo that you'd like to see as a pendant?

Tell me about it (via comment here on my blog), and I'll choose a random winner to create a custom pendant for you. Contest closes 3pm CT on Monday, Nov 8th. One entry per person...US only please.

For an extra chance to win, follow me via Google Reader, or any other RSS feed. Just leave a 2nd comment letting me know how you follow my blog.

It's a new day!

Sunday, October 24, 2010

Crafty Alert!

In my spare time, I made these earrings with some kits I got from a recent "big show".


Aren't they gorgeous?? I especially like the pair on the right.

Super simple and easy to make. I'll be doing a quickie tutorial in the next couple of weeks.

Here's another preview: This is a charm I did for a few DFW Pug Rescue volunteers


What's cool is that when I say "in my spare time", I really mean it. Each step takes maybe 10-15 minutes, so it's a nice little break during the day. I stop by my craft desk, add some glue, add the next layer or a bale, and on it goes!

Stay tuned for the tutorial...and I'll also include the links to my dealer...supplier!

Enjoy your new day!

Tuesday, October 12, 2010

Home Cooking with Love

Yup - another crafty project!
And this one fits in perfectly with my other hobby - cooking. 

It's a recipe book/stand/holder (Idunno exactly what to call it!)

This is done with October Afternoon's Thrift Shop, Cherry Hill and Farm Fresh lines. The book itself, chipboard shapes and letters are all Maya Road.
The colors are cherry, aqua, yellow, and white which I totally dig!

Here's the in-process project, quite messy, eh?
(are you Canadian, eh?)
(PS: Happy Thanksgiving to the Canadians, eh!)

(good morning....I digress!)


aaaaannnnd the finished project! (lots and lots of pages!)

isn't the little dress form with the apron adorable?! 
And the bowl of flowers? 
And a MILKCAP! 

And we start off with Breakfast Recipes. All good days start with a healthy breakfast! 


And appetizers (one of my favorite sections!)


Somehow I think this section will stay pretty empty... 


Another section I need to focus on - Veggies! 

And this would be anything that doesn't fall under beef, poultry or pork (as you'll see momentarily)
Hmm. somehow I missed a pic of the Poultry page. Sorry! 
You can see the tab in the pic above though.
Can't forget the chicken. It's a stable staple (how embarrassing!) in this household! 

I think I need to find a picture of a cow for this section: 

And then... and then. there's this section: 

Mm mm love me some pig!

Next up is the fresh catch of the day: 


And the last two tabs are my fave: desserts and drinks! 


Do you like??? 
So here's where I need your help - I need to fill this with recipes!! 
Who's got some new recipes to share? 
Anyone? 
Bueller?
Bueller?

ah well, enjoy your new day!


Saturday, October 9, 2010

I am Simply Spoiled

It's not what you think. 
So stop thinking mean thoughts. 
Yes, YOU!

I am not spoiled. 

That's not to say I don't like being spoiled on occasion (by someone special). 

But as a personality trait, I'm not spoiled.

I digress. (good morning..I digress!)

(I'll stop saying that, eventually.)

(I will!)

Anyway..."I am Simply Spoiled" is the name of one of the projects I recently completed at Maya Road's Artistic Journey. If you aren't familiar with Maya Road, and you like crafty stuff, check them out!! 

I will preface this with saying it isn't my favorite project, mostly b/c of the paper used. It's way too cutesy for me. There were things I loved about it though - the yellow ruffle ribbon, the craft paper envelopes, the milkcap stamp, and the craft-chipboard mini-album itself. 

I also really liked the idea of sealing in the glitter (on the crowns and buttons) with glossy accents. That keeps the glitter from going everywhere each time you touch the book. I'll remember that technique!

That said, I really think it turned out pretty cute! Here's the cover:


Inside 1st page:


Facing 2nd & 3rd pages: 


Pages 4 & 5: 


Pages 6 & 7


And the last page: 

So whaddya think? Are you spoiled?

Enjoy your new day!